I did say a while back that this blog would become somewhat random. Well, now I’m posting a review of a harness with which one can carry a camera. Variety, they say, is the spice of life.
I recently bought my first digital SLR camera, a Nikon D40. At the weekends I often climb up mountains, so it seems sensible that I use my nice new camera to take pictures of those mountains. As far as carrying a large camera up mountains goes, you have two options:
- Leave it in your pack all the way up there and back again
- Swear at it continually until you revert to option (1).
Enter the Cotton Carrier.

Simply put, The Cotton Carrier is a harness that straps over your chest and allows you to carry a large camera as though it was bolted to your chest. The unit has a sturdy plate which sits on your chest, and the camera attaches to that plate via a small mount that goes in the threaded tripod attachment on the camera. The camera is attached to the mount by turning it to face left and then sliding it into a groove – it cannot then be removed from the mount without turning it ninety degrees and sliding it upward, therefore making it unlikely (but not impossible) that you’ll disengage your camera from the mount by mistake. The device was created by Andy Cotton, a landscape photographer, and it’s described a lot better in Andy’s own introductory video on his web site.
I heard about this system from my boss, Doug – after explaining the whole concept to me he was then inspired to go out and buy one himself. It arrived on Thursday, and rather generously he lent it to me immediately so I could take it on my backpacking trip down the side of Lake Chelan that weekend. This I duly did, and here are my thoughts about the device. I ought to point out that Doug, being a man of great means, purchased the $170 complete system, but the parts that I am reviewing really just represent the $99 camera vest for regular cameras. The complete system has attachments for a secondary camera, bottle opener, lightning conductor, divining rod et cetera. Neither of these systems are cheap, so let’s hope it’s good!
Okay, it’s good. I was never an expert at suspense.
Putting on the harness was pretty simple and after a few experiments I found a height that works well for me on my chest. After you’ve done it a few times, taking the camera out of the carrier becomes almost instinctive. Once it’s out, it seems to magically end up exactly in the right place to take a picture – you can have the camera out of the carrier, take a photo and put it back in within a few seconds. It fits solidly into the mount so there’s never any doubt whether you’ve got it successfully in or not.
Historically I’ve always taken a point-and-shoot camera in my trouser pocket where it’s nice and accessible – carrying the SLR on the Cotton Carrier actually made it much simpler to take photos on the spur of the moment, especially given the extra power-on time that my compact camera seems to need. At one point, one of my backpacking companions leaned over and grabbed my SLR from my chest mount because he didn’t have the time to take his own compact camera from his pocket. It’s amazing the times when a handy pocket is actually not handy at all.
Alright, I think I’ve gushed about this enough now, so I’ll analyse a couple of details. First off, the way in which the camera is mounted to the stand. This is done via a small machined button – I’m please that it’s not heavy, but it does mean that the camera doesn’t sit level any more when you put it down on a table. The only real annoyance here is that it’s hard to take long exposure shots without actually using a tripod – I’m used to just sitting the camera on a rock, and it’s tricky to do that with the button on the bottom. The button comes off easily with the tool provided – it would be great if either the button was a little wider (so the camera could sit flat on it) or the tool could easily be attached to the harness itself (because, umm, I left it in the car). The slot to unscrew the button is pretty generic and the button could easily be removed with a coin or some other similar object, but I stopped short of this one given that the harness belonged to my boss and it might be a bit difficult to explain on Monday exactly what I had been trying to do with his brand new piece of camera equipment and a bent spork.
I was concerned that wearing the harness all day would make both it and me somewhat sweaty – somehow, this didn’t happen but I’m not exactly sure why. The carrier is made of some sort of mesh – Mr Cotton, I don’t know what this is or how it works, but please keep making it that way. Somehow, my rucksack straps ended up soaked, but the carrier did not.
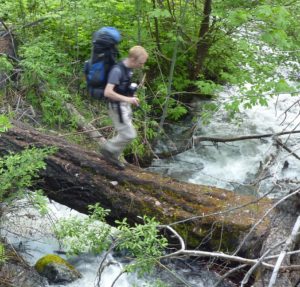
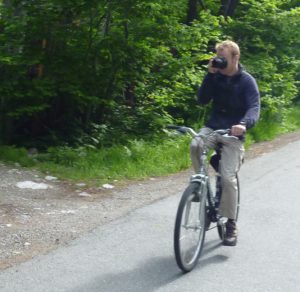
On the subject of rucksacks, the carrier can easily be worn at the same time as a large pack. As you can see from the photos, I was carrying somewhere around 20kgs of stuff in a 70 litre pack and the carrier fitted fine underneath. The shoulder straps are wide enough that they cause almost no discomfort, although if I had to choose I’d have them wider rather than narrower, as that would mean the backpack sat entirely on them which I think would be even better. The carrier was sitting high enough on my chest that the chest strap sat just above the waist straps on my rucksack, so this worked ideally. I could easily have worn a climbing harness as well, and the carrier wouldn’t have got in the way.
Any minus points? Well, I jotted down a couple. However, I’m very much convinced that the positioning the Cotton Carrier uses is precisely the correct place to carry a camera, and some of my gripes are around this. Firstly, I was using a water-bladder inside my rucksack to drink from – the problem with this is that you’re drinking water from a spout directly above the back of your camera so you have to be a little careful not to cheerfully pour a torrent on top of the thing. The solution to this one is, I think, just to drink more carefully. Secondly, it would be inadvisable to keep the neck strap on the camera when using the carrier unless you were going to also put it around your neck as an emergency measure – there’s a reasonable chance it would slip down and you’d end up putting a knee through it when climbing steep terrain. Again, not sure of the solution – the carrier itself comes with a “jesus strap” that you can attach to the harness, so the right answer here is probably just to embrace that, and ditch the old neck strap.
Overall, this is a superb piece of gear – as you know, I don’t make a habit of writing equipment reviews on this blog but I was so impressed with this harness that I felt I ought to write something. I was approached by two people during the backpacking trip asking me what it was and where I’d got it, and my backpacking chum told me he was sorely tempted to buy one because right now his $1000 DSLR camera was largely worthless, gathering dust in his basement. I’m amazed that this device isn’t an open secret in the climbing community, but it isn’t – I’ll certainly be doing my best to remedy that, and I hope Mr Cotton continues innovating because he’s onto the right thing.
Now to persuade the wife…
