Some web sites are bad. Just clicking on a link in an email can send you somewhere that looks like PayPal, asks for your login details and will then instantly automate the emptying of your account. Some web sites prompt you to download software which will encrypt all the files on your computer and then try to charge you for a decryption key. Some web sites are bad, m’kay?
Well, the great news is that Google have solved this problem. Rumour has it that the next version of Chrome will limit your web access to a predefined list of “known good” web sites. Sites can easily apply to be added to that list and, as long as Google approves them, they’ll be available in your browser the next day. Isn’t that great? I don’t think any other browser is going to be able to compete with Chrome once they get this out.
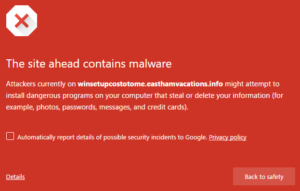
Of course, Google aren’t doing this. Because it is a terrible idea. The reality is that the existing security systems build into browsers actually do a pretty good job of preventing access to malicious web sites. Don’t believe me? Visit http://winsetupcostotome.easthamvacations.info/answered-polynomial-eccentricity-unserviceable/029287718218614814 . It contains malware that will install on your computer. Go on!
The site was first reported as malicious just today, but opening it in Chrome I see this:
Browsers, operating systems and the interconnecting web technologies have a bunch of mechanisms built into them to keep you safe online. And they work. How many times have you actually been caught by a phishing email, or installed apps that empty your bank account? How many people do you know who have?
Apple’s marketing around the app store is centered around the fact that it protects you from malware. Which is true to a degree – there’s almost no malware on the Apple app store. F-Secure estimates that 0.1% of apps on Google’s Play Store (which has no approval process) are malicious. But a whacking 10% of web sites are malicious. So why don’t you want a curated web site list?
I don’t want a curated web site list either. I also don’t want a curated app store – even one regulated by some sort of independent nonprofit would become a horrendous mess of inconsistencies, but one regulated by a corporation is even worse. Let’s take a look at a few of the actual Apple app store requirements. You can download the whole lot of them here and read them yourself if you like. What, you say? There’s 25 pages of them?! Oh, yes…
Let’s start with the easy ones.
3.15 Apps with previews that display personal information of a real person without permission will be rejected
Fair enough. That seems sensible and reasonably measurable.
4.1 Apps that do not notify and obtain user consent before collecting, transmitting, or using location data will be rejected
Seems fine to me.
14.1 Any App that is defamatory, offensive, mean-spirited, or likely to place the targeted individual or group in harm’s way will be rejected
Okay, I guess we don’t want people to be put in harm’s way. But offensive to one person isn’t necessarily offensive to another. What about Charlie Hebdo?
14.2 Professional political satirists and humorists are exempt from the ban on offensive or mean-spirited commentary
Oh okay. Am I a professional satirist?
2.18 Apps that encourage excessive consumption of alcohol or illegal substances, or encourage minors to consume alcohol or smoke cigarettes, will be rejected
I… hmm… what is excessive? And alcohol is legal – what’s wrong with me consuming plenty of it?
And here is the crux. A gatekeeping system that involves humans making judgement calls is almost impossible to keep fair and consistent. App developers know that the best way to get your app through these requirements is just to change something minor, resubmit it and hope you get someone different in whatever offshore team is reviewing these. I had one app that was just for submitting data to another system and required the user to log in. It was rejected due to 17.2 Apps that require users to share personal information, such as email address and date of birth, in order to function will be rejected. I resubmitted it with the same login screen and an “about” page but with a bug whereby it displayed an alert saying “[object object]” every time you ran it. It was immediately approved. My fix to remove the bug unfortunately took two weeks to make it through.
As well as making requirements that are hard to consistently measure, you’re making censorship calls on what your users may look at. Do I want to view anti-Jewish websites? No. Do I want to be prevented from viewing them? No, I do not.
18.2 Apps that contain user generated content that is frequently pornographic (e.g. “Chat Roulette” Apps) will be rejected
What the heck is “frequently”? I don’t know about you but I once shared a hotel with the crew of an aircraft carrier on shore leave and they were all sitting in the lobby on quite eye-opening Skype calls to their girlfriends. Also Skype is owned by Microsoft, a competitor of Apple’s. So probably a great idea getting rid of that. FaceTime doesn’t have to get store approval. Oh yeah, that reminds me:
3.1 Apps or metadata that mentions the name of any other mobile platform will be rejected
This was the requirement that recently started Apple blocking apps which mentioned Pebble support (the Apple Watch’s most viable competitor). Don’t worry, though, after some negative press coverage they eventually decided to stop paying attention to that requirement and instead hold the Pebble iOS app in review for a curiously long time.
And this, to my mind, is where the curated store really starts to leave a bad taste in the mouth. While some of these requirements are mechanically measurable and undeniably beneficial, the great majority of them range between ill-defined judgement calls and downright anti-competitive practice.
2.16 Multitasking Apps may only use background services for their intended purposes: VoIP, audio playback, location, task completion, local notifications, etc.
This is why your favourite mail app can’t actually download email in the background. It’s not that the platform can’t do it. It’s that only apps that Apple themselves made are allowed to do that.
2.17 Apps that browse the web must use the iOS WebKit framework and WebKit Javascript
You know what this means? This means the only web browser you can use on iOS is the Safari one. You installed Chrome for iOS? Well that’s not actually the Chrome browser. That’s just some Chrome icons and the default browser. You thought it was faster? You were wrong, my furry friend.
Apple takes a 30% cut of all revenue from apps. In 2014, that was $3Bn. While the app store purports to protect Apple’s customers from themselves, what it mainly does is prevent anyone making money in apps without giving Apple 30% of it.
11.2 Apps utilizing a system other than the In-App Purchase API (IAP) to purchase content, functionality, or services in an App will be rejected
11.13 Apps that link to external mechanisms for purchases or subscriptions to be used in the App, such as a “buy” button that goes to a web site to purchase a digital book, will be rejected
Ever wondered why the iOS Amazon app doesn’t have the ability to purchase things? It’s because Amazon don’t want to give Apple 30% of the money. Apple also blocked any updates to Microsoft’s SkyDrive app because they wanted their cut from users who paid for storage.
It’s almost hard believe but, in the 1980s, Microsoft was the darling of the tech world. They disrupted a near-monopoly on software and hardware and made a brand new technology available to a huge mass of people. They spent the next decade destroying their competitors via any means available and are still paying the goodwill price of that behaviour twenty years later. Let’s hope everyone can learn from that lesson.